Mac 10.5 System Source Code now Available
Apple has published on her site the open source code part of its OS (code name Darwin).
The code can be found here, and it includes bootloader code, frameworks, bundles, and many kext.
Mac shortcut on keyboard button
Every now and then i read of a keyboard trick or shortcut that i didn't know exist,
i have decided to open this post/thread to contain all my findings in this area,
it will be periodically updated instead of opening small posts regarding such shortcuts.
Show in Finder
Command+Click on an icon,shortcut or dock icon and it will open the Finder and locate the original location for that icon.
Make Alias
select an icon (folder, application, document whatever), and just click:
Command+L
iPhoto/iTunes choose library
Option+Click on the icon and it will display a "Choose Library..." dialog, in case you would like to split your libraries and save disk/partition space.


Switch between tabs in safari
Command+Shift+LeftArrow or Command+Shift+RightArrow
Open new tab in safari
Command+T
Open new window in safari
Command+N
Go To in Finder
Command+Shift+G
it will open a text-field dialog allowing any path to be clicked, and you can use tab to autocomplete just like in terminal, and if you won't press tab and just wait for a second or two it will suggest the correct word as you type.

SpotLight search from keyboard
Ctrl+Space
"Show icons as" in Finder from keyboard
Command+1 up to Command+4
Delete without drag to trash
select the files/folders you want to delete and press:
Command+Backspace
"Empty trash" from keyboard (when Finder in focus)
Command+Shift+Backspace
Open Special folders
when finder is the focused application:
Command+Shift+H Home
Command+Shift+D Desktop
Command+Shift+K Network
Command+Shift+U Utilities
Command+Shift+C Computer
Open FrontRow
Command+Esc
Help Menu
Command+Shift+? Help
Block select in Terminal
Option+Click+Drag it will select block in the terminal

Back and Forward
Command+[ Back
Command+] Forward
it will work in Safari and Finder (not sure where else)
Menu with keyboard
Ctrl+F2
Dock with keyboard
Ctrl+F3
Rearange MenuBar
Command+Click+Drag
you can rearrange and also remove by dragging out of the menubar
Eject all removable media
in order to eject all removable media (CD, DVD, etc.) Simply:
Press and Hold F12
Hide current window and focus the next
if you hold down Option and click on a window the current window will hide,
if you reach to a point where all windows are hidden (or one is still visible),
then you can move between windows (even by clicking on the dock icon) and only one window will be visible at any given moment.
Option+Click on next window
Ctrl+Alt+Del on Mac
the combination is Command+Option+Esc
in hackintosh its: WinKey+Alt+Esc
it will display the open applications and you can choose to quite or force quit
Minimize Window
Command+M
Hidden menu commands
some menu will change their strings and keyboard shortcuts,
or even display hidden menu item if you hold down the Command or Option key while the menu display.
for instance right click Finder Dock icon and press Option (if already displayed will show "Hide Others" instead of "Hide") if pressed during right click will show hidden "Relaunch" menu item.
another example is to press the apple menu and hold down the Option key, it will change "About this mac" to "System Profiler" the shutdown,restart and logout to immediately do the action without a dialog and time wait period.
another example: in Finder hold down Option key and the Quick look icon will turn to slideShow icon.
QuickLook Full Screen
Command+Option+Y
Auto Hide the Dock
Command+Option+D
Search in dictionary (for Cocoa Application)
Zoom In: Command+Option++
Zoom Out: Command+Option+-
the complete list of OS X keyboard shortcuts found here.
How-To Install and Boot from new kernel
This post will display how to install new kernel, and it will also display how to boot from alternative kernel, plus some trouble shooting advices.
1. what is a kernel?
Kernel is the core and center of the OS, it interface the hardware and it is the nearest code to hardware there is, it gives the OS and the applications services on the computer (such as CPU, memory access, threading, networking, filesystem etc.) for further reading you can refer to my dev blog post: Kernel Basics.
the reasons mostly comes from bug fixed, features added to hackintosh and not available with the version you are using, or just to know you are up-to-date (any new post in insanelymac, netkas or on the net will relate to your version), if you are not confidant in your abilities to update the kernel, then avoid it until you must, it can crash your system (although can be easily reversed)
- EFI supported kernel are available at netkas blog links from the irc channel.
- you can also download the latest kernel and its relevant kext from the open source darwin project, compile it, and patch it using netkas EFI patch using this procedure(for more advanced users - not recommended).
once downloaded (probably from netks blog) backup your current kernel (/mach_kernel), copy it to the root file system and rename it to "mach_kernel", fix permissions, and your done.
now for the step by step procedure:
a. download the binary mach_kernel file into a folder (for instance desktop)
b. copy the file from downloaded folder (e.g. desktop) to the root folder
- open terminal
- write: sudo -s
- enter your password when prompt and press enter
- cp ~/Desktop/mach_kernel_9.2 /
c. backup your current kernel by renaming it
- mv /mach_kernel /mach_kernel_9.0
d. rename the downloaded kernel to the mach_kernel file name
- mv /mach_kernel_9.2 /mach_kernel
e. fix permissions and reboot
- chown 0:0 /mach_kernel
- chmod 755 /mach_kernel
5. how to boot from alternate kernel?
if you do not trust the downloaded kernel, you can ask darwin boot loader to load from a different kernel file, just by stating the full path of the kernel as the first parameter in the boot prompt.
for instance if the downloaded kernel name is: mach_kernel_9.2 then you copy it to the root of the files system using finder or terminal, (from command line: cp mach_kernel_9.2 /).
next, in the boot prompt you write: /mach_kernel_9.2 -v
i added the -v so you can see where other parameters goes.
6. what if something goes wrong?
you can easily reverse the procedure, first you can use the boot from alternate kernel, and booting into the backed up kernel (/mach_kernel_9.0 as first parameter to darwin boot loader).
second you can boot from the install DVD into single user mode, mount the file system and rename the new kernel, copy the backed up kernel as /mach_kernel file name and reboot (i will add a post regarding single user boot, mount, and other unix shell commands needed for the procedure).
Tweaking Mac Theme
Is there a possibility to tweak Mac theme? (why would you like to?)
well, according to many articles there is no way to do it since OS X has released.
up to Mac OS 9 mac OS was a UI tweakers paradise, but since OS X was released all tweaking abilities, API, and related utilities was discarded, not supported, hidden using private access etc. (example for such article), later when Leopard arrived even OS X applications that some how managed to work (mostly by accessing unsupported and private APIs) stopped working.
OS X Tiger 10.4.x had several applications like: WindowShade X, ShapeShifter, FruitMenu, ofcource no application is worth without a good theme/visual style/icons... collections.
here are some sites to support these applications:
Max Themes
Interface Lift
Win Customize (although mostly for windows still icon is icon, wallpaper is wallpaper)
what about Leopard?
since Leopard is built out of applications such as "Dock.app", "Finder.app"..., and the applications are folders and can be browsed using "Show Package Contents", you will find in almost any application (or kext or bundle or action or ...) a folder named "Resources", it will contain images, plist XML files, Strings, etc., color, font, size definitions, sounds, icons etc. will reside here as a resource.
if you change many of these OS characteristics you end up with a different look and feel or theme of leopard.
for instance you can check the content of resources folder found at Finder like this:
- goto folder "/System/Library/CoreServices"
- right click file: "Finder.app"
- select "Show Package Contents"
- from the new finder window go in to folder "Contents"
- enter folder "Resources"
you can find and replace the file "burnableFolder.icns" with other icon
from that point on your icon will display differently.

but since we don't like to work manually, we need some theme tweaking apps/utils, luckily that is exactly what i am going to cover.
CandyBar

first application is CandyBar the most popular application that knows how to change icons, dock icons, system icons, browse icontainer, etc.
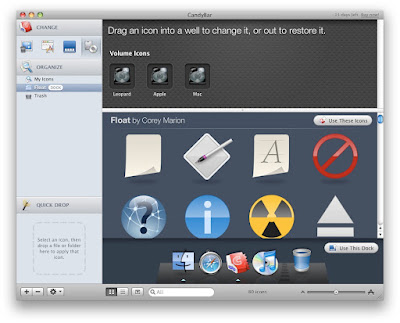
you open up a window that display icons that your current system has and icons that you can replace to. you can add icons of your own, downloaded, you can at any time restore the default icon of each changed icon, it knows to relaunch the dock/finder application when needed (if you allow it), there is a trial version, and it is really easy to use.
you can change the look of your dock for instance as displayed in this post.
here is my resulting Dock:

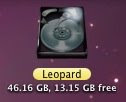
here are several example of my tweaked icons using CandyBar:


DockColor

next is DockColor, a very very straight forward application, it doesn't get simpler then this.
it is a color picker with a image displaying the Dock surface, you choose the Dock color you want and press apply, thats it (beside of allowing by entering your password).
take a look at the result:

Palette

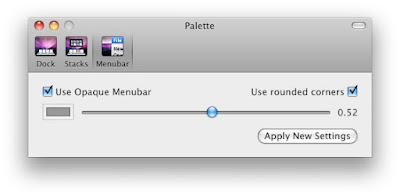
another good application to change the dock colors is "Palette" it has the ability to control the dock colors with more details such as color opacity, surface image opacity, if the dock frontline is colored with the same color etc.

Palette can also change gradually the translucency of the menu bar (10.5 and 10.5.1 only), use round corners for the menu bar, and change stack icons. the only annoying thing is that the trial version leave text on the dock (i would prefer time period limit) so it is unusable for this purposes.
here are several dock examples:


LeopardDocks

"LeopardDocks" started as a site that display how to tweak the dock and then uploaded many examples and designs, then they came out with LeopardDocks application (was written by "William Spong") that allows you to change the dock look and feel, by downloading a zip file from the "LeopardDocks site" and plug them into the application and change your dock.

one more thing you can do with LeopardDocks is to add a separator between running applications and permanent dock icons, well actually it is an icon that is invisible so you can move it around and even drag it out side of the dock in order to remove it from the dock.

Stacks Drawers
if we are talking about the dock then you need to take a look at the "Add Drawer to Stacks" post that display how to add drawers to the stacks. also i stumbled on this post that is very detailed on the graphical side of creating the drawers.
Displaperture

this application is very weird, its probably for Mac veterans, way back when apple display screen had round corners, not sure if on purpose or outcome of old technology, well if you are one of the old mac users and miss your screen round corners, or just think it's funky then download it from here, run it, choose the corners you would like to be round, scroll the slider to the amount of roundness it needs to be, and press quit. next time you run the application the round corners appears and the application window will not. if you want to setup or quit, just double click the application icon again and the window appears.

what about some content?
well there are a lot of sites that supply icons, wallpapers, stacks icon and application pimping sets. here are some examples:
WebShots
Inner Mind Media
Apple Icons+ScreenSavers
McDo Design
Louie Mantia
GUI Styles
Free Wallpapers
Icons.cx
Dockulicious
Pixel Girl Icons
set of icons
UsingMac
we can also add some command line defaults tweaks:
remove Finder Buttons background
write in terminal:
defaults write "Apple Global Domain" CUIAllowDebugPrefs 1
defaults write "Apple Global Domain" CUIDisableArtFile 1
killall Finder
instead of this:

you should see this:

if you decide to do that you can manually change colors of Cocoa applications in mac (like Finder, Safari, etc.)
you need to go to the folder:
/System/Library/PrivateFrameworks/CoreUI.framework/Versions/A/Resources/AquaUI.bundle/Contents/Resources
and you can edit and change colors of PNG files especially with the word Material in the files name, the previous written terminal commands cause the mac to work using the vector graphics engine that draws its resources from this folder, the material files help mac to decide how a certain color looks if light is dropped in front of an object and what gradient color to use in each corner and angle, also other files used for layers and transparency (alpha) etc.
look at this example called Milk-Like look and feel created by another user on this post:
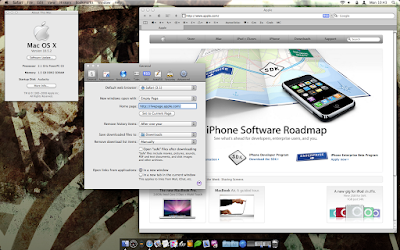
also look at this example a more darker look and feel (notice the close resize minimize buttons):

Note: this will hit your performance badly.
Change Finder Background
- open Finder Window
- right click an empty area
- choose "Show View Options"
- from the lower part (Background) choose Color (or image)
- click on the white color box and choose color
- press "Use as Defaults"
- close the popup
Note: this will work only in Icon View!


Change Selection Color
- from the apple menu goto "System Preferences"
- enter "Appearance" tab
- change "Highlight Color" to whatever you want


Example of two results i got:


 Read More......
Make menubar Translucent
this is the way to enable or disable the translucency of your menu bar (10.5.2):
1. from the apple menu choose "System Preferences..."

2. click the "Desktop & Screen Saver" icon

3. check or uncheck the lower check box "Translucent Menu Bar"

Change Logon Screen with JPG images
Do you ever whant to change your Login screen? now the time to appreciated it.
The login screen background is found here:
/System/Library/CoreServices
and can be replaced using any jpg image you find on the web, do this:
1. open terminal cd to that folder ("cd /System/Library/CoreServices")
2. write: "sudo mv DefaultDesktop.jpg DefaultDesktop.orig.jpg"
3. enter your password and press enter
4. copy some jpg you downloaded from the internet to that folder using Finder
5. rename the image using terminal to the name: "DefaultDesktop.jpg"
6. chmod 644 DefaultDesktop.jpg
7. chown 0:0 DefaultDesktop.jpg
8. logout or reboot
Top 15 Hints for Apple Mac Leopard
It’s been almost a month since Leopard was officially released, and in that month we’ve had some time to play with the OS and get to know it. Here are the Top 15 Leopard Hints we’ve come across this past month (in no particular order).
Collect all windows in one Space When you are in the birds-eye view of Spaces (F8 by default) press the ‘C’ button to collect all open windows into a single space with a nice effect. And if you hold down shift when you hit the ‘C’ key, it will happen in slow motion.
Zoom PDFs and Images in Quick Look If you are browsing PDFs or images in Quick look mode, there is a fast and easy way to zoom in. Simply option-click the window and it will zoom in, and shift-option click and it will zoom out. Alternatively, you can hit Cmd = to zoom in, or Cmd - to zoom out.
Enable the Path Bar in the Finder Go to the view menu in the Finder and click View Path Bar to see the hierarchy of where your file is. You can also control-click or right-click on any of the folders in the path bar, and perform actions on them.
Quickly send a window to a Space Leopard supports “bumping” your windows to other Spaces. Simply drag your window to the edge of your screen, and wait a second. The window will fly over to the adjacent space.
Address Book Effects Now Address Book has the ability to add effects much like Photobooth. Simply click the edit button for one of your contacts, click the pictures, and then click the little “swirl” style button. This allows you to apply many different effects to your photos.
Quickly access System Profiler When diagnosing someone’s mac, you want to get to System Profiler as fast as you can. A little shortcut is to hold down the “option” key on the keyboard while pressing the Apple in the menu bar. The ‘About This Mac’ will turn to ‘System Profiler...”.
Add a ‘recent things’ stack to the Dock You can add a recent applications or documents stack to your dock very easily. Just pop open terminal and enter:
defaults write com.apple.dock persistent-others -array-add ‘{ “tile-data” = { “list-type” = 1; }; “tile-type” = “recents-tile”; }’Then simply do a KillAll Dock command to reset your Dock, and your new stack will be there. Right-click it to set what you want it to have recent-things of.
Auto Remove Printer after Print One of my pet peeves with Leopard is that the Printer will not automatically quit after it prints. Well, all you have to do is right click on the printer icon in the dock, and hit the “Auto-Quit” option. This will automatically quit the printer after a print job is complete.
Disable Spotlight from the menu bar If you want to get rid of Spotlight from the menu bar, simply open terminal and run:
sudo chmod 0 /System/Library/CoreServices/Spotlight.appTo re-enable it you just have to run:
sudo chmod 755 /System/Library/CoreServices/Spotlight.appPermanently Delete files from Time Machine Backups While navigating Time Machine, go to the present view, and click the little gear icon in the toolbar of the Finder while you have the file you want to delete selected. Simply click the option to Delete all Time Machine backups of this file, and the file will be gone forever.
Quickly enable or disable sharing for a folder If you want to quickly share a particular folder with someone on your local network, click the folder, and hit Cmd-I to bring up the “Get Info” window. From there, simply checkmark the “Share Folder” button, and others will be able to access it over the network.
Unlearn words from the Dictionary Words that you have added to the system dictionary such as “Yurechko” can be unlearned easily in Leopard. All you have to do is right-click on the word that you want to unlearn, and click the unlearn button. This only works in some applications.
Use Expanded print Dialog by default Leopard comes with a very handy expanded Print View which allows you to see previews of what you are printing (very handy for printing websites), however, you always have to click the little arrow button to view it. It you want this expanded view to be the default, simply open Terminal and run:
defaults write -g PMPrintingExpandedStateForPrint -bool TRUEIf you want to set it for all users, run:
defaults write /Library/Preferences/.GlobalPreferences PMPrintingExpandedStateForPrint -bool TRUESwitch to lowercase labels in the Finder’s sidebar Many people don’t like the capital letters in the Finder sidebar. In order to change these to lowercase, navigate to
/System/Library/CoreServices/Finder.app/Contents/Resources/English.lproj/Duplicate the LocalizableCore.strings file for backup, and then edit lines 50 to 53 to make them lowercase.
“SD5” = “Devices”; “SD6” = “Shared”; “SD7” = “Search for”; “SD8” = “Places”;Save the file and the open the Terminal and type: ‘killall Finder’
See detailed Airport information Leopard’s wifi capabilities have been dramatically improved. Now, it is even easier to get more information about the access point you are connected to. By option-clicking on the wifi menu bar item, you can see the MAC address, channel, signal strength (RSSI), and even the transmit rate. very handy for mobile users.

