Upgrading RAM on MacBook
I knew when I purchased my MacBook that the 512MB of RAM which it came with wouldn’t suffice for my needs. I held off until I could justify upgrading the RAM as I have the luxury of owning two Macs. I use my iMac for anything intensive and my MacBook as a second machine. As my iMac is home alone in Cork and I’m up in the “Big Smoke” of exotic Dublin, the time had finally come to upgrade.
And thus began a little bit of research into the matter of upgrading RAM on a MacBook..
The first thing you need to do is to find out what type of RAM comes installed on your MacBook. You can check this by clicking on the Apple Icon and by going to ‘About This Mac’. The second row will indicate the type of RAM you have. In my case I have 2GB 667 HMz DDR2 SDRAM (previously I had 512MB).

Once you know what you need to buy you need to find a reseller. Steer well clear of Apple when buying RAM. A quick search for RAM at Applestore.ie indicates that 2GB of RAM would cost me €290!
Crucial are by far the cheapest supplier of RAM. I purchased the same 2GB of RAM which Apple had priced at €290 for €70. That’s more than a 400% difference in price.
The Crucial website is extermely user friendly when selecting your product. They have a step by step ’shop assistant’ which guides you to the correct product before checking out. Be sure to avoid any confusion by double checking your processor type when selecting your model as there are Intel Core Duo and Intel Core 2 Duo types available.

RAM has never been cheaper so go for as much RAM as you can afford.
I ordered my 2GBs of RAM on a Tuesday evening from Crucial’s American based store and I had the package in my hands on a Friday morning in Dublin! I was extremely impressed with their speedy delivery!
The actual RAM installation was an absolute breeze. The only thing you should be made aware of are Apple’s use of tiny screws. You will need a screwdriver such as a Phillips size 00 screwdriver to complete the job.
There is an excellent guide on how to install RAM on a MacBook on apples’ site.
When placing the RAM within the slot be sure to apply firm pressure in order to get it into the bracket provided. If you place your fingers at either end of the inserted RAM and if you notice that you can slightly nudge the RAM then you haven’t applied enough pressure.
I have a single GB of RAM on my iMac and no doubt I’ll be upgrading that in the not too distant future as well.
![]()
Release "Recent Application" feature on Mac
This tweak is very useful, i cant imagine why apple hasn't integrated it itself (there aren't lots of things apple hasn't thought about in its OS unlike windows where third party is necessary and no way to do without)

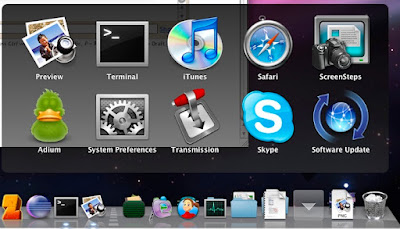
this tweak adds a recently used application stack to the dock and allows to see as a stack the recent applications you lunched.
in order to do that open terminal and use this command (don't use sudo!):
defaults write com.apple.dock persistent-others -array-add '{ "tile-data" = { "list-type" = 1; }; "tile-type" = "recents-tile"; }'
killall Dock
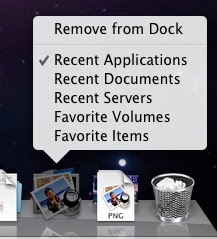
after the stack is in the dock you can change it to show one of:
"Recent Applications"
"Recent Documents"
"Recent Server" (no icons for some reason)
"Favorite volumes"
"Favorite Items"
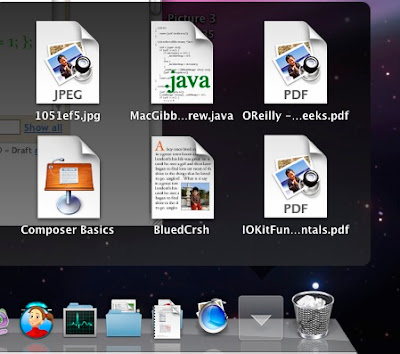
also you can call the command several times and add as many stacks as you want so you can have "Recent Documents" and "Recent Applications" as etc.
![]()
Show "Date and Time" in menu bar
The menu bar clock always annoyed me since even windows clock supplied more data, and the maximum i got from the menu bar clock beside the time was day.
well i found out that there is a way to make the date year and the whole shebang appear, this is how to do it:
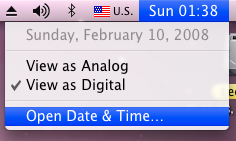
1. right click the menu bar clock and choose "Open Date & Time ..."
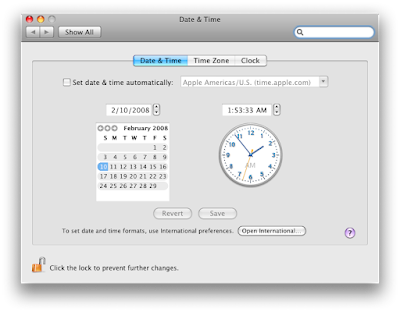
2. click on the "Open International ..." button
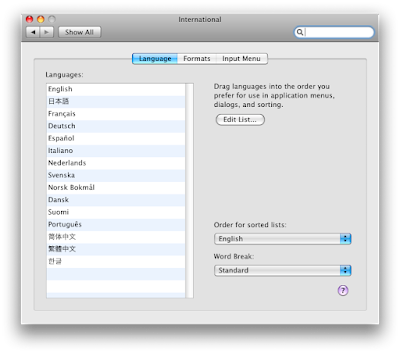
3. select "Formats" tab
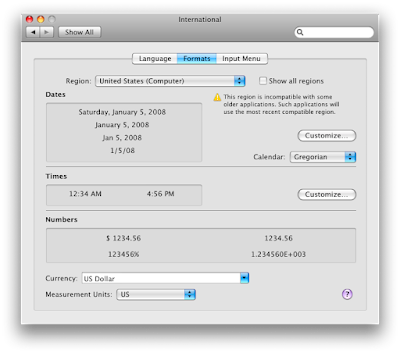
4. in the Dates section press "Customize ..." button, in the Show drop down select Medium
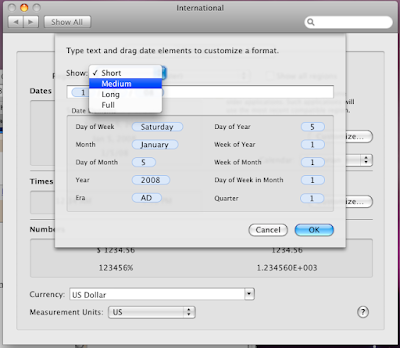
5. set your preferred format by dragging the appropriate "Time Elements" and clicking on them to set more details
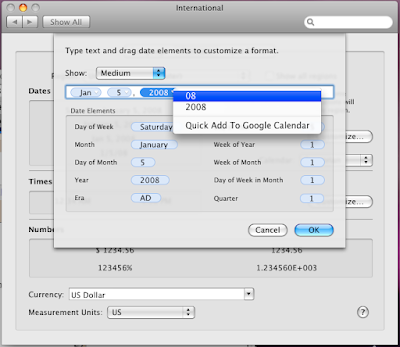
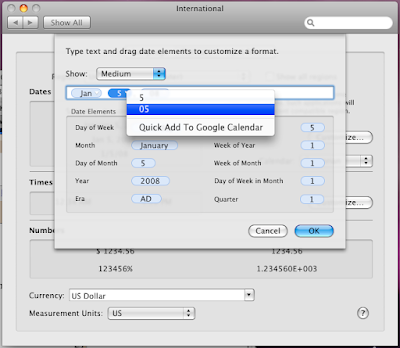
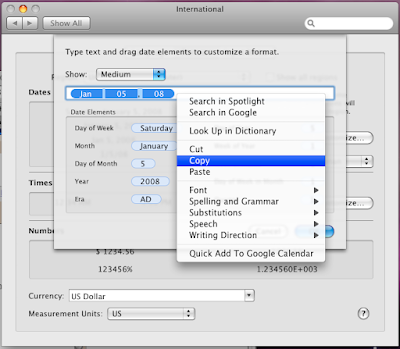
6. then select all time elements at the text field by Option+A and copy by Option+C (or drag to select and right click empty space and copy)
7. press "OK" and then "Customize ..." at the Times section
8. from the "Show" drop down select "Full" (remove unwanted elements such as seconds or GMT...)
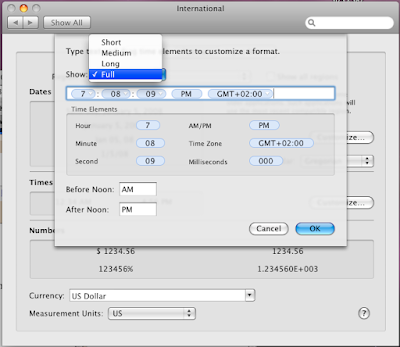
9. left to the time elements paste by Option+V (or right click paste)
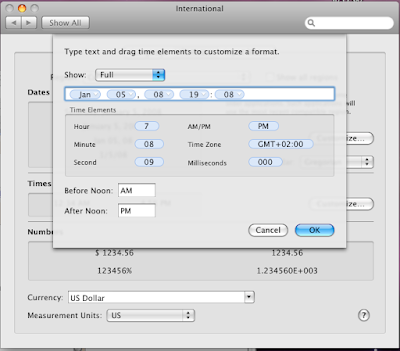
10. press space to separate time and date and click OK

thats it you now have date in the menu bar clock.
![]()
Quick Silver
I am not sure how i stumblled upon Quick Silver, but it should be the first App to be installed on every new mac.
Quick Silver is a utility that extend the Finder capabilities, it is a combination of a search engine (like SpotLight and GoogleDesktop) with right click abilities, and then some (Open, Delete, Rename, Mail to...).
the idea is simple (like all great things are), to allow a user from the keyboard to perform (almost) all actions on a resource (Application, File, Folder, Network share, URL, etc...)
there are many advanced abilities, several User Interface, and endless list of plugins,
Quick Silver is available for mac only, (windows users have replica like Launchy, and SkyLine) QS is available for download from these locations:
BlackTree - Home Site
SoftPedia - Mirror 1
MacUpdate - Mirror 2 (love macupdate)
VersionTracker - Mirror 3 (track versions. what a great idea)
hope you will love QS as much as i do.
![]()
Adding "New File" in Context Menu
Another feature that is absent (i don't really need it) from mac but exist in windows is the right-click "New file_type..." for instnce "New Text File",
well come to think of it thats about it! i never used the other file types, pictures? there are too many types to put there and i always used photoshop/msPaint etc in order to create one and even if i did create one i then go right away and open the application that edit them so what is the use? the same goes to word, power point and excel what ever.
so for the sake of argument lets assume we want the new txt file ability, so there is another add on utility that adds it self to the context menu More sub menu and allow create new document types from templates and it allows you to add templates and types of your own, and edit the one that exists, its really good and quite simple (as most good things are) it only copy the template to the place you clicked.
it is called "Nufile" it can be downloaded from here.
the installation is simple (next next next, or as mac version: continue, continue, continue)
and the result looks like this:

![]()
Add "Cut" Feature
the most absent feature in mac is the right click->cut (on files and folders),
i wonder who is the jerk in apple that is keeping us from getting this feature,
PathFinder is a good replacement for Finder and it has cut feature,
but it lacks several features that the new Finder in leopard has, for instance Cover-Flow, quick look etc.
1. open terminal and write this line:
defaults write com.apple.finder AllowCutForItems 1
2. restart Finder, in terminal write:
killall Finder
or
right click dock finder icon with option button pressed (Alt/WinKey in hackintosh) and choose "relaunch"
to undo this simply execute the same lines only this time replace the value 1 with 0 like this:
defaults write com.apple.finder AllowCutForItems 0
killall Finder

but when you try it you find its just another "move to trash" menu item, well that didn't help,
that was when i decided to download the add on to context menu FileCutter
it
gives you the option to cut paste, move to... etc. but the annoying
part is that it is a sub menu inside a sub menu, in leopard all add ons
to context menu is added to the More sub Menu, and file cutter is a sub
menu in its own, so in order to cut you go 3 levels deep - yuc! i wish
there was a way to add cut directly to the context menu next to copy
feature without any mess

![]()
List of Download Mac File, Direct-Link Blog
This are the blog/sites that containt much of Mac files, that you can download freely.
MacFiles - this site has Software,Ebooks,Tutorials,Fonts,Games,Plugins
FullDls - full downloads torrents links, this link is directly to mac sorted by seeders
Fink Project - The Fink project bring the full world of Unix Open Source software to Darwin and Mac OS X.
Mecho DDL - Direct downloads apps games (mac and windows)
Lemon Share - great site with tons of mac apps/games/utils all free all cracked
Mecho Forum - has lots of mag apps/games direct links
No Mercy Mac - another great rapidshare for mac utilities, books, and software
Demonoid Torrents - free torrents site has mac section
Hacker-VIP - hacked premium Mac applications
Rapid Mac - another blogspot that share mac rapidshare links (games, apps, ebooks...)
Mac4Share - Links to popular macintosh software. Software for mac on rapidshare
Phaze DDL - best direct link site on the web got mac section too
![]()

